Our Free School Fundraiser Participation Waiver Form Template

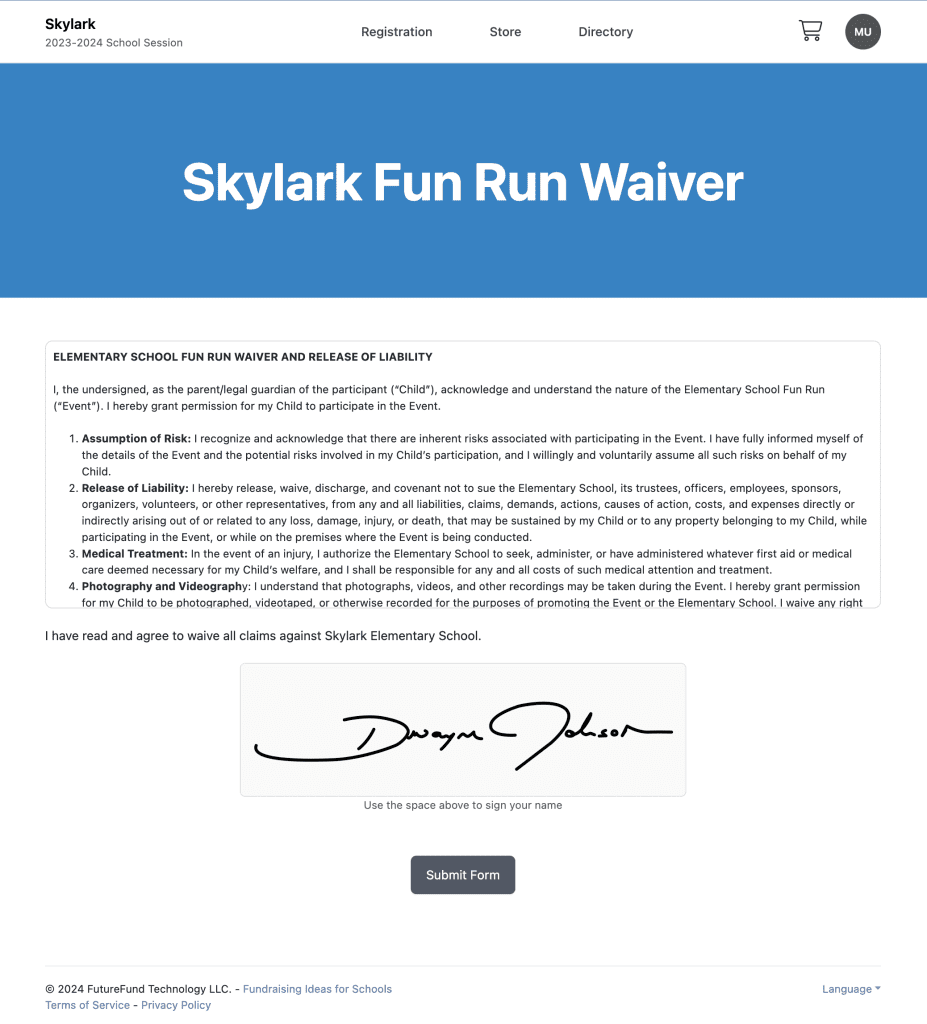
Students often need permission from their parents and guardians before they can participate in your A-Thon fundraisers and other events, so your school group needs to make this step as easy as possible if you want lots of students to register! Fortunately, we've made that part easy.
FutureFund's registration tools make it easy to set up custom participation waiver forms-and if you're not a user yet, we've also included a downloadable template below that you can use to manually create a school fundraiser participation waiver form in just a couple of minutes.
Download the Template Here
Note: This template is intended as a guideline. Please consult your school's legal advisor for compliance with local laws and regulations.
How to Use This Template
Our template is as simple and self-explanatory as possible, but here are some instructions to keep in mind while tailoring it for the needs of your school or PTA:
- Remember to replace the following fields with your school's specific details:
- [School Name/Logo]
- [School Address]
- [School Phone Number]
- [School Email]
- Edit the following fields as per your fundraiser details:
- Event name
- Event Date
- Location
- In the "Waiver & Additional Information Section", add or modify any specific terms or conditions relevant to your school's policy and the nature of the fundraiser event.

Creating a Fundraiser Participation Waiver Form with FutureFund
The template above will save you some time if you need to create waiver forms manually, but FutureFund can make the process even easier. When you use our platform, you can quickly create custom forms and waiver and share them with automatically generated links. Here's how:
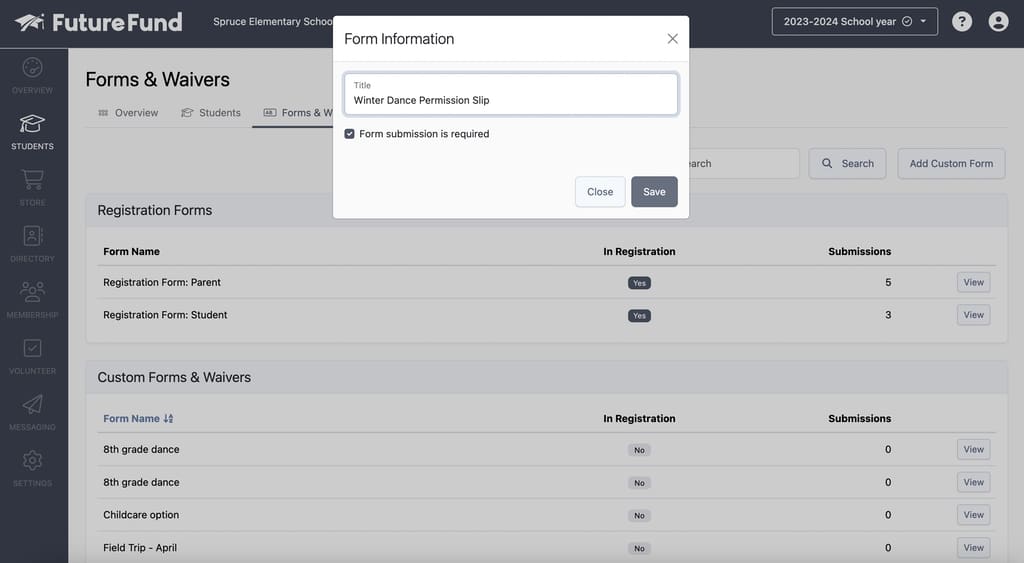
- In the admin, navigate to Students.
- Click the Forms & Waivers tab at the top of the screen.
- Under Custom Forms & Waivers, you'll see a list of all current forms for your school group.
- To build a new participation waiver form, click Add Form.
- Give your form a title and click Save.

Editing Your Participation Waiver Form
- Once you've created your custom form, find it in the Custom Forms & Waivers list and click the View button next to it.
- Change the elements of your form by clicking the Add Element button at the bottom.
- To rearrange the elements of your form, click the three lines icon that appears to the left of each element when you mouse-over it and then drag it to where you want it.
Sharing Your Form & Viewing Responses
- To share your form, click the Share tab at the top of the screen.
- Copy the link that appears into messages sent with FutureFund, emails, social media posts, and other places. Make sure you also include it in the campaign page for your fundraiser so that donors or registrants can easily complete it.
- To see form responses, click the View Responses tab.
Help Students Sign Up for Your Fundraisers & Watch Participation Soar
The easier you make it for parents to give participation to students, the more of them you can expect to register for your fundraisers and the more you'll likely raise. The manual template we've provided in this post can help, but using FutureFund to build and send your waiver forms is even easier-and can save valuable time for your parent volunteers.
Get started now with our platform that is 100% free for school groups, or explore the FAQ to learn more about building your waiver forms. Together, we'll help make sure your school fundraisers bring in more interest, and more money for your community.
Frequently Asked Questions about FutureFund's Forms & Waivers
What elements can I put in FutureFund forms & waivers?
The custom forms and waivers you create in FutureFund can have any of the following elements:
- Text blocks: Rich text displayed on the page.
- PDF files: Display an inlined PDF.
- Short text boxes: One-line text response.
- Long text boxes: Multi-line text response.
- Checkboxes: Boolean input element implemented as a checkbox for yes/no or true/false questions.
- Date fields: Date field input.
- Birthdate fields: Capture the month and day. Great for the birthday boards.
- Signature fields: Capture digital signatures online.
- Teacher selectors: Allows the selection of a teacher. Teachers are managed in the Directory > Teachers page. This element is not supported in Student or Parent registration forms.
- Student selectors: Allows the selection of a student from the current registration session. This element is not supported in Student or Parent registration forms or sharable forms.
- Parent selectors: Allows the selection of a parent from the current registration session. This element is not supported in Student or Parent registration forms or sharable forms.
- Custom selectors: Allow the select from a custom list.

Can I create a manual permission form and upload it to FutureFund?
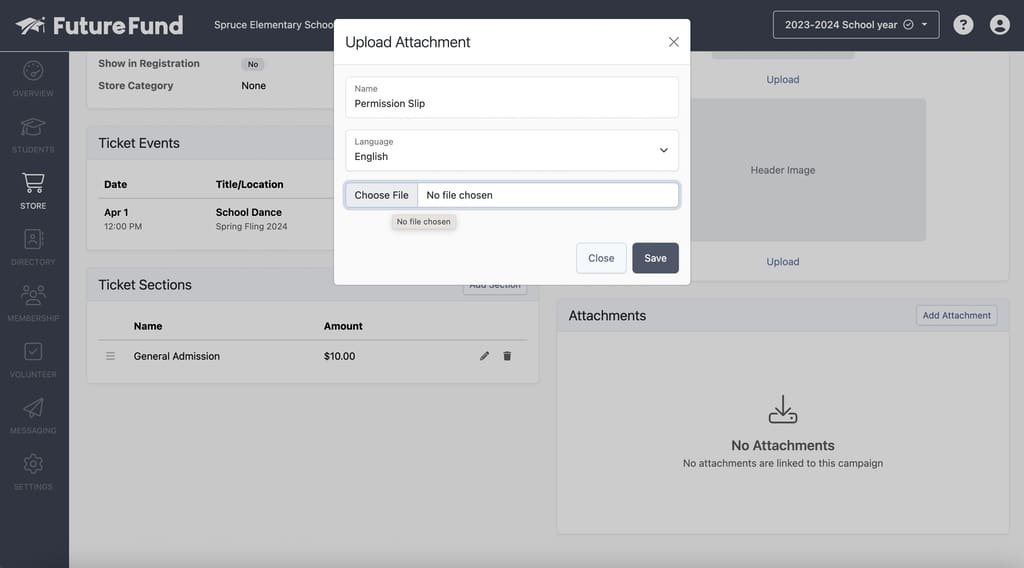
Yes! Simply create your form using the template in this article (or another tool of your choice), then save it as a PDF and upload it to your FutureFund campaign by following these steps:
- In the admin, navigate to Campaigns.
- Click the View button next to your campaign.
- Navigate to the Design tab and scroll down to the field marked Attachments.
- Click Add Attachment.
- Name your attachment, choose the language used, and click Choose File.
- Upload the PDF of your permission form, then click Save.

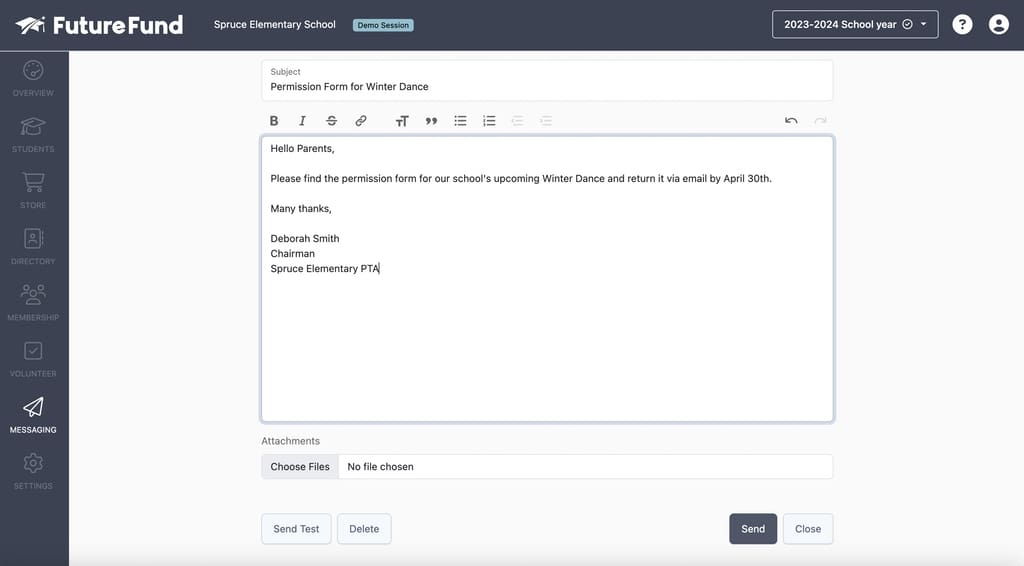
Can I use FutureFund's messaging system to send manual permission forms & waivers?
Yes! Just follow these steps:
- In the admin, navigate to Messages.
- Create a new message, then add your recipients, subject, and body text.
- When you're finished, go to the Attachments field at the bottom and click Choose File.
- Upload the PDF of your permission form, then click Send.